Introduction to Chocolate Lava Cakes
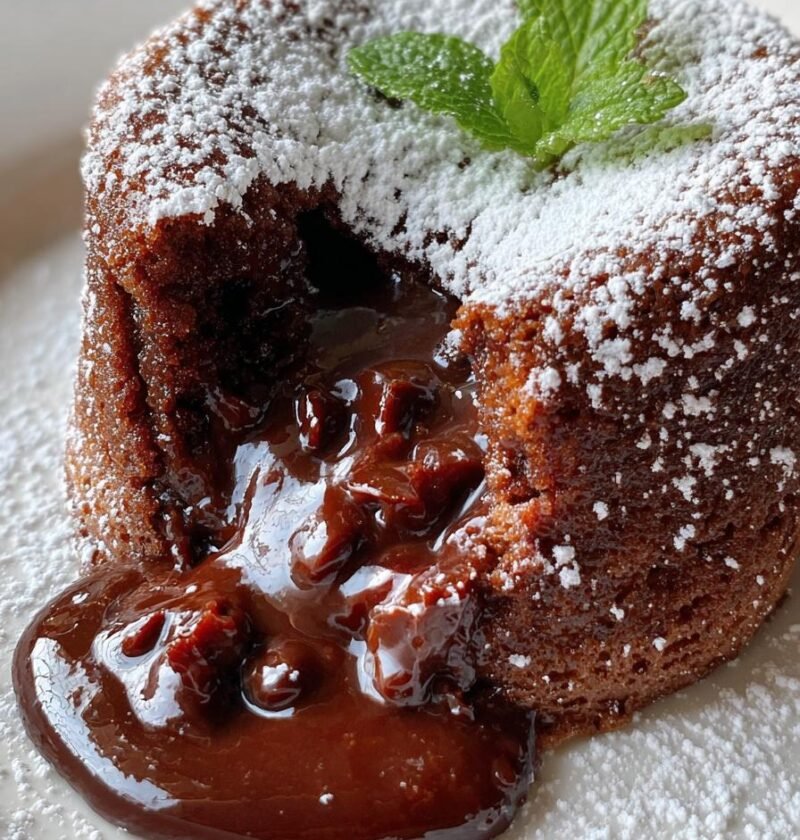
There’s something magical about chocolate lava cakes that makes my heart skip a beat. The moment you cut into one, that gooey molten center flows out like a sweet river of joy. If you’re a busy mom or a professional juggling a million tasks, this recipe is your secret weapon. It’s quick, easy, and perfect for impressing loved ones or treating yourself after a long day. Trust me, these little delights will melt your heart and bring smiles to the faces around your table. Let’s dive into this delicious adventure together!
Why You’ll Love This Chocolate Lava Cake
Chocolate lava cakes are the ultimate dessert for busy lives. They come together in just 15 minutes, making them a quick solution for unexpected guests or a sweet treat after dinner. The rich, velvety chocolate flavor is simply irresistible, and the molten center? Pure bliss! Plus, they’re easy to customize, so you can make them your own. Trust me, once you try these, they’ll become a go-to favorite!
Ingredients for Chocolate Lava Cakes
Gathering the right ingredients is the first step to creating these delightful chocolate lava cakes. Here’s what you’ll need:
- Unsalted butter: This adds richness and helps create that tender texture. You can use salted butter, but it may alter the flavor slightly.
- Semi-sweet chocolate chips: The star of the show! They provide that deep chocolate flavor. Dark chocolate can be a great substitute if you prefer a more intense taste.
- Large eggs: Essential for structure and moisture. They help the cake rise beautifully.
- Large egg yolks: These add richness and create that luscious molten center we all crave.
- Granulated sugar: Sweetens the batter and balances the bitterness of the chocolate. You can swap it for brown sugar for a hint of caramel flavor.
- All-purpose flour: Just a touch is needed to give the cakes structure without making them too dense.
- Vanilla extract: A splash of this adds warmth and enhances the chocolate flavor. Feel free to use almond extract for a unique twist.
- Pinch of salt: This elevates the flavors and balances the sweetness.
For exact measurements, check the bottom of the article where you can find everything listed for easy printing. Now that we have our ingredients ready, let’s get cooking!
How to Make Chocolate Lava Cakes
Now that we have our ingredients ready, let’s get into the fun part—making these chocolate lava cakes! Follow these simple steps, and you’ll be on your way to dessert heaven.
Step 1: Preheat the Oven
First things first, preheat your oven to 425°F (220°C). Preheating is crucial because it ensures that your cakes bake evenly. If the oven isn’t hot enough, the centers won’t melt properly, and we definitely want that gooey goodness!
Step 2: Prepare the Ramekins
Next, grab four ramekins and grease them with butter. Make sure to coat the sides well. Then, dust them lightly with flour. This step is key for easy removal after baking. You want your cakes to slide out effortlessly, revealing that beautiful molten center.
Step 3: Melt the Chocolate and Butter
Now, let’s melt the butter and chocolate chips together. You can do this in a microwave or a double boiler. If using a microwave, heat in short bursts, stirring in between. This prevents the chocolate from burning. We want it smooth and glossy, like a silky chocolate river!
Step 4: Whisk the Eggs and Sugar
In a separate bowl, whisk together the eggs, egg yolks, and granulated sugar. You’re aiming for a pale, thick mixture. This will take a minute or two. The air you incorporate here is what helps the cakes rise beautifully, so don’t rush it!
Step 5: Combine Mixtures
Now, gently stir the melted chocolate mixture into the egg mixture. Be careful not to scramble the eggs! You want to create a harmonious blend of chocolatey goodness. It should look rich and inviting.
Step 6: Fold in Dry Ingredients
Next, it’s time to fold in the flour, vanilla extract, and salt. Use a spatula and gently lift the batter from the bottom, turning it over. This technique keeps the batter airy, which is essential for that perfect lava effect.
Step 7: Fill the Ramekins
Now, divide the batter evenly among the prepared ramekins. I like to use an ice cream scoop for this—it makes portioning a breeze! Fill them about three-quarters full to allow room for rising.
Step 8: Bake to Perfection
Pop the ramekins in the oven and bake for 12-14 minutes. Keep an eye on them! The edges should be firm, but the center will still look soft. This is the sweet spot for that molten center we all crave.
Step 9: Serve Immediately
Once baked, let the cakes cool for just one minute. Then, carefully invert them onto plates. Serve immediately for the best experience. Watching that gooey chocolate flow out is pure magic!
Tips for Success
- Don’t overbake! Keep an eye on the timer to ensure that molten center stays gooey.
- Use room temperature eggs for better mixing and a fluffier texture.
- Prepare the batter ahead of time and refrigerate it. Just bake when you’re ready!
- Experiment with different chocolate types for unique flavors.
- Serve with a scoop of ice cream or a dollop of whipped cream for extra indulgence.
Equipment Needed
- Ramekins: Use four 6-ounce ramekins. If you don’t have them, muffin tins work in a pinch!
- Mixing bowls: A medium bowl for the egg mixture and a larger one for melting chocolate.
- Whisk: A hand whisk or electric mixer will do the trick.
- Spatula: Essential for folding in ingredients without deflating the batter.
- Microwave or double boiler: For melting chocolate safely.
Variations of Chocolate Lava Cakes
- Nutty Delight: Add chopped nuts like walnuts or hazelnuts to the batter for a crunchy texture.
- Mint Chocolate: Incorporate a few drops of peppermint extract for a refreshing twist.
- Spicy Kick: Mix in a pinch of cayenne pepper or chili powder for a surprising heat that complements the chocolate.
- Gluten-Free Option: Substitute all-purpose flour with almond flour or a gluten-free flour blend.
- Vegan Version: Use flax eggs (1 tablespoon ground flaxseed mixed with 2.5 tablespoons water) and dairy-free chocolate for a plant-based treat.
Serving Suggestions for Chocolate Lava Cakes
- Pair with a scoop of vanilla ice cream for a delightful contrast in temperature and texture.
- Top with fresh berries like raspberries or strawberries for a pop of color and tartness.
- Drizzle with chocolate or caramel sauce for an extra indulgent touch.
- Serve with a dollop of whipped cream to enhance the richness.
- For drinks, a cup of espresso or a glass of dessert wine complements the chocolate beautifully.
FAQs about Chocolate Lava Cakes
Can I make chocolate lava cakes ahead of time?
Absolutely! You can prepare the batter in advance and refrigerate it. Just fill the ramekins and bake them when you’re ready to serve. This makes it a perfect dessert for entertaining!
What if my chocolate lava cakes don’t have a molten center?
If your cakes are overbaked, they may not have that gooey center. Keep an eye on the baking time. The edges should be firm, but the center should still look soft and jiggly when you take them out.
Can I use different types of chocolate?
Yes! While semi-sweet chocolate chips are classic, you can experiment with dark chocolate for a richer flavor or even milk chocolate for a sweeter treat. Just remember, the type of chocolate will affect the overall taste.
How do I store leftover chocolate lava cakes?
If you have any leftovers (which is rare!), store them in an airtight container in the fridge for up to two days. Reheat them in the microwave for a few seconds before serving to revive that molten center.
Can I make these lava cakes in a different size?
Definitely! You can use larger ramekins or even muffin tins. Just adjust the baking time accordingly. Larger cakes may need a few extra minutes, while smaller ones will bake faster. Keep an eye on them!
Final Thoughts
Making chocolate lava cakes is more than just baking; it’s about creating moments of joy. The thrill of cutting into that warm, gooey center is a delightful experience that brings smiles to everyone around the table. Whether you’re celebrating a special occasion or simply treating yourself after a long day, these little cakes are sure to impress. Plus, they’re so easy to whip up, even on the busiest of nights! So, gather your loved ones, serve these decadent treats, and watch as they melt hearts—one delicious bite at a time!
PrintChocolate lava cakes that melt your heart instantly!
Deliciously rich chocolate lava cakes with a gooey molten center that will melt your heart.
- Prep Time: 15 minutes
- Cook Time: 12-14 minutes
- Total Time: 30 minutes
- Yield: 4 servings 1x
- Category: Dessert
- Method: Baking
- Cuisine: American
- Diet: Vegetarian
Ingredients
- 1/2 cup unsalted butter
- 1 cup semi-sweet chocolate chips
- 2 large eggs
- 2 large egg yolks
- 1/4 cup granulated sugar
- 2 tablespoons all-purpose flour
- 1 teaspoon vanilla extract
- Pinch of salt
Instructions
- Preheat the oven to 425°F (220°C).
- Grease four ramekins with butter and dust with flour.
- Melt the butter and chocolate chips together in a microwave or double boiler.
- In a separate bowl, whisk together the eggs, egg yolks, and sugar until pale and thick.
- Stir the melted chocolate mixture into the egg mixture.
- Fold in the flour, vanilla extract, and salt until just combined.
- Divide the batter evenly among the prepared ramekins.
- Bake for 12-14 minutes until the edges are firm but the center is soft.
- Let cool for 1 minute, then invert onto plates and serve immediately.
Notes
- Serve with vanilla ice cream or whipped cream for extra indulgence.
- Make sure not to overbake to keep the center molten.
- Can be prepared ahead of time and refrigerated before baking.
Nutrition
- Serving Size: 1 cake
- Calories: 350
- Sugar: 25g
- Sodium: 150mg
- Fat: 22g
- Saturated Fat: 13g
- Unsaturated Fat: 7g
- Trans Fat: 0g
- Carbohydrates: 30g
- Fiber: 2g
- Protein: 5g
- Cholesterol: 100mg